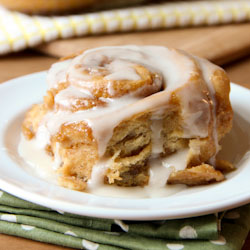
Overnight Gingerbread Cinnamon Rolls
Fluffy gingerbread cinnamon rolls, made easier by preparing a day ahead. Top off with sweet vanilla icing.

Last week, I posed a question on Facebook, for if I should continue with Christmas recipes or move on to New Year’s food. It’s such a hard call since Christmas is next week and surely many people have a plan in mind for what they want. But at the same time it’s hard to skip over a holiday when it hasn’t happened. And yet… that only leaves a week for New Years! So… This may be the last Christmas post of 2012, or not. I’m undecided. It could certainly change and I guess only time will tell.
So far I’ve shared all sweets, perfect for cookie exchanges and holiday parties. But a request was made for breakfast. What do you plan for breakfast on Christmas morning? No one wants to stand by the stove slaving away before or even after presents have been torn open. You want something simple and easy, yet still completely tasty. And here is the solution: overnight gingerbread cinnamon rolls. I went with gingerbread because, I’ve already done apple cinnamon sticky buns, orange rolls and even pumpkin cinnamon rolls. Gingerbread just seemed right as it’s one of my favorite flavors of the season. From cookies to bread and even cupcakes. It’s very versatile.

Prepare this the day before, pop them in the fridge and simply bake when you’re ready. The only work you’ll have to do the day of is whip up some sweet icing to top off these fluffy rolls with. Fluffy, sweet, gooey and just perfect for Christmas morning… or any lazy weekend day.
Overnight Gingerbread Cinnamon Rolls
Ingredients
Dough ingredients:
- 4-4 1/2 C all purpose flour
- 1/4 C light brown sugar
- 1/2 tsp salt
- 2 1/4 tsp rapid rise yeast
- 1/4 tsp cinnamon
- 1/4 tsp ginger
- 1/8 tsp nutmeg
- 3 Tbsp unsalted butter, melted
- 3/4 C milk, heated to 115°F
- 1/3 C molasses
Filling ingredients:
- 1 C light brown sugar
- 1 tsp cinnamon
- 1/4 tsp ginger
- 1/4 tsp nutmeg
- 1/2 C unsalted butter, melted
Icing ingredients:
- 2 C powdered sugar
- 1 tsp vanilla extract
- 3-4 Tbsp milk
Instructions
- In a large bowl or stand mixer, add 2 cups of flour plus remaining dry dough ingredients. Melt butter and heat milk to 115°F, test temperature after 45 seconds and do 10-15 second intervals until you reach the correct temperature.
- With the mixer on low, add molasses, melted butter and warm milk. Add remaining all purpose flour by spoonfuls until fully incorporated and dough is no longer sticking to the bowl. Only add enough flour to pull dough together, all of it may not be necessary.
- Grease a large bowl with baking spray, such as Pam for baking. Lightly grease your hands, pat dough into a smooth ball and transfer to prepared bowl. Cover and allow to rise for 1 hour.
- Use a silicone counter mat or flour your work surface lightly. Roll out your dough to roughly a 12x20 rectangle. In a small bowl, combine dry filling ingredients. Brush melted butter over entire surface. Sprinkle brown sugar mixture over entire surface. If any butter remains, drizzle over dough and filling.
- Beginning at one of the short ends, roll dough as tightly as possible. Lightly pinch to seal the ends. Slice into 12 equal pieces. Place in a lightly greased 9x13 rectangular baking dish. Cover with plastic wrap and chill overnight.
- When ready to bake, remove prepared rolls from the refrigerator, allowing the baking dish to come to room temperature. Preheat oven to 350°F.
- In a small bowl, beat icing ingredients until smooth, set aside.
- Bake rolls for 25-30 minutes. Drizzle with icing immediately.
Notes
*Disclaimer: This post contains affiliate links.

What a great way to make breakfast less stressful. I’ve been looking for a good make-ahead cinnamon roll recipe for a while now, and these look like the ones! :D
Rachel – These sound and look heavenly! I am always looking for make-ahead bread and roll recipes and love that you’ve tested these and that they come out as planned doing it that way! Pinning so I can remember to make them!
Cinnamon rolls are the best and adding ginger and spices to them sounds wonderful. I bet a little spice in the glaze would be great too!
i love that these are overnight rolls – i hate having to think of breakfast sometimes and these would be perfect to make the evening or afternoon before and i’d wake up & pop them in the oven and be so happy in half an hour :) i really like that instead of the regular cinnamon rolls, you added gingerbread to this. so much more festive and more depth of flavor and warmth!
It look so delicious.Love it very much.Perfect for the holidays!!!
Rachel…these sound divine! I’ve already made 3 dozen caramel pecan rolls & they are in the freezer, but I will make these for Christmas morning! Will be great with a cup of coffee from my new Keurig! :) Thanks for the yummy sounding recipe! :)
good choice moving on to gingerbread!!
Thanks for a very do-able recipe. I will be trying these!
Oh these look like heaven!! I was going to do just plain cinnamon rolls for our Christmas, but now I might have to update!
These look SO freaking delicious Rachel. I can barely stand it. Perfect for Christmas brunch!
Oh goodness. This one’s a keeper… perfect recipe for my hubs to make! Then I’ll cook the bacon and pour the orange juice! YUM! :)
I HAVE to make these! My daughter just read the recipe with me. We are going to make it together :) Thanks!
Mmm! I usually do cinnamon rolls on Christmas morning but I want to make these instead of my usual ones!
I love overnite rolls. GIngerbread makes them even better!
OMG I have to make these!!!! I have to bring breakfast into work on friday. I so need to make these
The most daunting part of most cinnamon rolls is how early you normally would have to wake up to make them start to finish. But this is great so be able to let them sit overnight!
oh goodness, these sound perfect!!
I love cinnamon rolls and I love the idea of not having to make them the morning of even better!! Can’t wait to try these!
The flavors were soooo good! everyone loved these at work!!
I just saw this on my pinterest page. I can not wait to make these. Thank you for the recipe.
Ok, I can’t wait till Christmas to make this – I’m making it tonight! Did you use a dough hook or a paddle attachment on your mixer?
Sorry I didn’t note that in the recipe and I honestly don’t remember now. I believe I used the hook but I have used the paddle in the past for similar recipes.
i wanted these to work! these didn’t work out for me…the dough was super dense. i realized eggs weren’t in this…so kind of combined this recipe with alten browns i found on food network. any tips?
I’m sorry to hear you had trouble with them. Unfortunately I can’t be sure what went wrong on your end as these are based on another recipe I made with adaptions for the flavoring and did not have issues either time.
Didn’t work for me either. Dreadfully dense mixture and a horrible waste of ingredients.
I’m sorry to hear you had trouble. It has been a successful recipe for me, as you can see from the photos. I can’t be sure what went wrong for you.
I tried making this last night and the dough just crumbled in my hands. I couldn’t roll it into any size or even get it to stick together.
I’m sorry to hear you had trouble. Unfortunately since I wasn’t there, I can’t be sure what could have gone wrong for you.
Sadly, I had the same problem with this recipe. It turned into a dense ball of dough that my heavy-duty mixer could barely work. I couldn’t even get the full 4.5 cups of flour into the mix. It never rose, and forget trying to roll it out. Disappointing.
I’m sorry to hear you had trouble. While baking is a science, there is almost always room for adjustments. If a dough is too sticky, typically you add more flour and if it’s too dry you would need to add more liquid of some variety. While it worked for myself and others, (this and other recipes) won’t always work as written for everyone for various reasons. However, you’ll be happy to know that I have a new gingerbread roll coming soon. Look for that in the coming weeks :) I hope you’ll try it and have better success!
I made a version of these too! I love gingerbread. Yours look really delicious!
Thanks Sarah!
Didn’t read the reviews first & I should have. Did not work for me either.
Never came together into a ball, just crumbly. Then when I added a bit of water, turned into gummy mess. Never rose at all. Wasted my ingredients! I’m sad because these look really terrific!
Following the directions exactly should give perfect results. This recipe is adapted from another and both worked, as you can see from the photos. I’m sorry you had trouble with it. I have a newer version that you may prefer to try: overnight apple gingerbread cinnamon rolls.
Another vote for “I wish I read the comments first”. I had the same problem as everyone else.
There are a lot of factors that come into play with bread/yeast baking and there is almost always room for adjustments with recipes. If you’re not comfortable with bread baking, be sure to always read everything before beginning. I have since posted a newer version of a similar roll that others have had great success with. I’d love for you to check that out and try again: overnight apple gingerbread cinnamon rolls