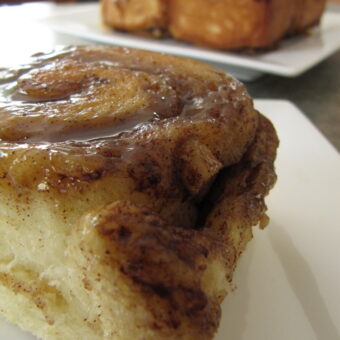
Apple Cinnamon Sticky Buns

Weeks, maybe even months ago, I had thought about making these but didn’t want to wait the several hours it takes to make them. Finally I decided to make them even if it meant having cinnamon buns for lunch. Breakfast is totally acceptable at any point during the day but I needed to pick the perfect day to make them. Two to three hours is needed start to finish. I’ve read that you could make the buns and either freeze them and thaw overnight letting them rise or you can pop the tray in your fridge and have them do their final rise overnight. That would certainly help the madness a bit and maybe if we were having company or planning this for some kind of brunch or gathering it’d be worth planning ahead. Making these while company is over would definitely not be ideal or recommended. But if you are up for some totally gooey cinnamon buns, you should at some point try these.

Apple Cinnamon Sticky Buns
Ingredients
Dough:
- 3 1/2 - 4 1/2 C all purpose flour
- 1/4 C granulated sugar
- 1/4 tsp salt
- 1 pkg rapid rise yeast
- 3 Tb unsalted butter
- 2 large eggs
- 1 1/4 C milk
- 2 1/2 tsp vanilla
Filling:
- 1 C brown sugar
- 2 1/2 tsp cinnamon
- 1/2 C unsalted butter, soft
Topping:
- 3/4 C brown sugar
- 6 Tb unsalted butter
Icing:
- 1 C powdered sugar
- 2 Tb milk
- 1/2 tsp almond or vanilla extract
Instructions
- In the bowl of a stand mixer, stir together 2 cups flour with salt, sugar and yeast. You may choose to use your dough hook or paddle. I find the paddle attachment works great for most recipes, including this one. Melt your butter and heat up your milk. Add to the bowl your melted butter, warm milk, eggs and vanilla. Mix well. Adding 1/2 cup of flour at a time, begin encorporating the remaining 1 1/2 - 2 1/2 cups of flour. I found that I needed 4 1/2 cups total. Depending on the weather you may not need as much. You want to keep mixing and adding flour until your dough isn't super sticky and pulls away from the sides of your bowl. At that point you can transfer it to a lightly floured work space of your choosing.
- Knead by hand for 5 - 10 minutes. Form into a ball. Cover with a kitchen towel and let rise for one hour or until at least doubled in size.
- In the meantime prep part of your filling and sticky bun topping.
- Remove butter from fridge and let soften to room temperature. Toss sugar and cinnamon in a bowl, set aside. Choose what your other filling will be. If you are using raisins, measure out 1 cup and set aside. If you will be using apples, set aside 1 apple but do not cut yet.
- In a small bowl, toss in sugar and melted butter. Whisk until combined well. Spray a 9x13 baking pan with baking spray. Mmmm pam for baking. Smells like cake. spread your sticky bun topping on the inside bottom of your pan. Feel free to mix in chopped nuts or leave the sticky bun topping plain.
- If your dough rises anything like mine did, you'll be amazed at how large it gets. Huge! I wasn't expecting that but it's definitely better than it not rising at all. Punch down your dough and begin to roll out with a rolling pin. You want the dough to be roughly a foot wide and almost as long as your rolling pin. Just roughly, not exact but it gives you an idea of sizing. Figure, a few inches wider and longer than your pan even.
- When your dough is fully rolled out and you are satisfied with it's shape, cover one side completely with filling. Sprinkly with topping, raisins, apples etc. If you are using raisins, sprinkle 1 cup or a bit more. If using an apple you will want to peel and slice at this point. I chose to use apples and made some pretty small pieces. Next time I will likely make the apple pieces just as thin but probably bigger in every other way. I thought itty bitty pieces would be nice but I definitely want more of an apple taste in the future. You could also choose to do both apple and raisins if you wish.
- Starting at one of your shorter sides, begin rolling your dough into a log. Seal off the edges by pinching well. Slice into 12 equal pieces. I marked lines on it to help guide my way, starting with half way then another to mark the 1/4 and 3/4 spots. It's easier that way than guessing and being off totally. You want these to be as similar in size as possible. After each slice, transfer to your prepared baking dish.
- Cover pan with a kitchen towel and let sit for another hour or until nice and puffy, nearly doubled in size. You will absolutely see a difference at the hour mark.
- Preheat your oven to 350F°. Bake for 25 minutes.
- In a small bowl, mix together sugar, milk and almond (or vanilla). I would have used vanilla but ran out and figured almond would probably do the trick in this situation. It did work well and gave it a nice and different flavor. So, choose whichever you prefer. Set aside.
- Using a large platter or cutting board, flip your sticky buns out of the baking pan. Do this by placing your platter or cutting board on your pan, holding together and flip. Then slowly and carefully lift up on your pan. Here's the mess... aah the beautiful and delicious drizzle of sticky bun topping running everywhere. No worries, it cleans up rather easy.
- If you are topping off with icing, drizzle icing mixture with a wisk over your sticky buns nearly immediately. No need to let these cool off much. You do want to eat them warm as they are especially good this way. A quick pop in the microwave works well too if they've cooled off too much for you.

Pingback: Fall: Apples
Pingback: Apples
Yum! My mouth is watering. I am going to make yours this weekend and another batch of my recipe too
Did you forget the step that provides instructions for using the butter that is identified in the filling? For the filling, the instructions only seem to say combine the brown sugar and cinnamon.
Rub softened butter over the dough surface prior to sprinkling with brown sugar and cinnamon. Alternately, brushing melted butter over the dough would yield the same results as I have done that with other recipes since. Enjoy!