Strawberry S’more Tarts

In the summer what’s better than a delicious s’more? They a summer staple and an absolute tradition for many. S’mores almost seem like a childhood right of passage. People often make them for the first time while camping over a fire. These days backyard firepits and even s’more makers seem more common and likely. Quite frankly, I don’t care how they’re made. They just need to be made. Every kid, and adult for that matter, needs a s’more.
S’mores bring back sweet memories for me. I don’t remember ever making s’mores over a campfire. Though I’m sure at some point we made them that way, it’s not where my memory lies at all. For me, the memory is in a silly simple way. I remember visiting my Gramma for sleepovers and she’d make s’mores in the microwave. Okay so it was a really simple way to make them but as a kid I didn’t care one bit. Maybe the other reason why this memory is cherished so much is due to the fact that supposedly she couldn’t cook. I’ve heard many stories about me teasing her as a little kid or just stories from my Dad’s childhood. Oh the stories. Some people really were not meant to be in the kitchen, but the fact that she made delicious s’mores special for me made my world.
I haven’t had a s’more probably since I was little and even though I occasionally crave one, I don’t have the care in the world to make one right now. Someday we’ll have a firepit or go camping and pass off this tradition to our girls, but there is still plenty of time to do that. In the meantime there is a really simple and adult version of s’mores. I made it a few years back but followed the recipe as written. These days I don’t do that so much. Occasionally it’s just adding something little or changing the quantities a bit more to my personal liking, other times it’s a complete mash up. I take the idea and play around with it to make it my own. For the most part this is in it’s original state as Pillsbury would have you make, but I did make some key changes that I feel are for the better.
If you’re going to make a s’more, keep it traditional and make it with real milk chocolate not semi-sweet baking chocolate – okay? That right there is one of the biggest points I have to make. Using the right chocolate is important, it will give you a better flavor more true to the original dessert. The other key alteration I made was an addition of cinnamon to the crust. And boy was that a good change. Mmm I love cinnamon. You almost can’t ever go wrong with adding cinnamon. We had a joke discussion the other week talking about how cinnamon could make almost anything better, and in most cases I fully feel that is true. So do add the cinnamon.

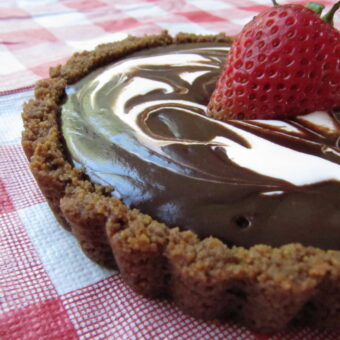
I made mini versions of the big tart, simply because I’m on a mini kick. Mini pies, mini cheesecakes, and now the tarts. It’s a more personalized size and is absolutely the perfect size. Plus it means no cutting! I don’t like cutting slices for people because there is always one in the crowd that wants a sliver, I don’t do slivers. If you’re going to eat dessert, go all out. Eat a real size and enjoy it. Slivers are now allowed in my house.

Strawberry S'more Tarts
Ingredients
- 1 C graham crackers
- 1/4 C granulated sugar
- 1/4 C unsalted butter
- 1/2 tbsp cinnamon
- 8 - 9 oz milk chocolate, 2 large Hershey bars
- 2/3 C whipping cream
- 1 C sliced strawberries
- 1/2 C fluff
- 4-8 whole strawberries
Instructions
- Preheat oven to 350F°. In a food processor, turn graham crackers in to fine crumbs. If you do not have a food processor, add graham crackers to a large plastic bag, use a rolling pin or meat tenderizer to smash crackers into crumbs. Add sugar, cinnamon and melted butter to the crumbs in your food processor, blend. If you do not have a food processor, use a small bowl, toss with a spoon or fork until combined.
- Press mixture into your tart pan(s) evenly on the bottom and up the sides. Use a smooth flat object to help press and secure the crumbs better, a measuring cup or some other smooth cup is great. With the mini tarts, I used a large cookie scoop to divde the crumb mixture, reserving a small amount of crumbs to fill in any holes. Bake for 10 minutes. If at this point your crust has bubbled at all, press down with your flat cup again. Set aside to cool completely.
- Meanwhile, in a sauspan or double boiler (my own personal preference), heat whipping cream over medium heat until bubbles form around the edge. While your cream is heating, break chocolate up into pieces. When bubbles appear, reduce heat to low and begin adding chocolate. Stir until all chocolate has been added and is completely melted. Remove from heat and allow to cool to a lightly warm and touchable temperature. Stir occasionally.
- When your crust(s) have cooled, layer sliced strawberries evenly and completely on the bottom.
- Pour chocolate over strawberries. In a heatsafe bowl, briefly microwave fluff. 15 seconds max should do the trick. Give a quick stir. Using a small cookie scoop or spoon, drop dollops of marshmallow over chocolate. Use a knife to swirl the marshmallow and chocolate together. Be careful not to disturb the strawberries.
- Top off with whole strawberries arranged neatly around the edge for a large tart or one in the center for minis. Chill in the fridge for 30 minutes or more before serving. More is always better as it gives the tart more time to cool off and harden. Keep cool until serving as this will melt immediately on a hot day.

I love the fluff swirled into the chocolate. My husband LOVES anything s’more related, so I gotta make this!
It was a huge hit the first time I made it, so I had to go back and make mini versions! I hope you like it if you end up trying it :)
Strawberry, s’mores, mallow, chocolate – woman what have you done?!?! And how have I not seen these until now!! Between the strawberry nana smoothies and these I can’t decide!
lol they’re ancient, that’s probably why ;) I should really update them sometime… not so tiny pics and all that. Plus I’d get to eat them again mmmm