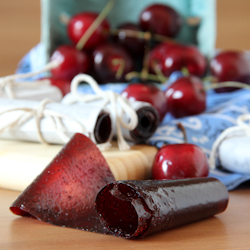
Cherry Fruit Leather

As a kid I loved fruit rollups and all of their bite sized gummy counterparts. Okay, I still do. In fact, I really can’t even have them in the house because if I know they’re around I’ll eat them one after the other until they’re gone. One package of gummies or one roll simply isn’t enough. A serving size is a whole box, right? Or at least it should be!

Cherry prices have dropped and I took advantage of that. My only problem was deciding what to make with them. Sure, I could eat them as is but besides it being tasty… what’s the fun in that? I had a need to make something different. Muffins wouldn’t do. Neither would jam… not that I know how to can anything. So I decided…
Have fruit? Will make fruit leather.

My kids pretty much devoured these. I noticed that the longer they sit, the better they are too… if they last that long! Sticky, fruity, fun, good for you kind of snack. I’ll absolutely be making this again in other flavors. It took a bit of time but was completely worth the effort. The best part of this is not only knowing what ingredients go into them but the endless possibilities of flavors. Think fruit combos. Mmmm. Dreaming up awesomeness now.


Cherry Fruit Leather
Ingredients
- 4 C cherries
- 1/4 C water
- 1/3 C granulated sugar
Instructions
- Preheat oven to 170°F. Prepare two baking sheets with silicone baking mats.
- Remove stems and pits from cherries. If you don't have a cherry pitter, I highly recommend getting one. They make quick work of prepping cherries.
- Place cherries and water in a large saucepan. Bring to a low boil, stirring and cooking until all cherries have broken down.
- Transfer to a blender (a food processor or hand blender may also be used). Blend until completely smooth. Return to pan. Add sugar and cook until thickened, roughly 10 minutes.
- Divide mixture between prepared baking sheets. Use an offset spatula to spread out the cherry mixture as evenly as possible.
- Bake in oven, rotating pans every hour for 5 hours or until just slightly tacky.
- Place a sheet of parchment and cutting board onto of fruit leather. Flip pan, removing pan and silicone baking sheet.
- Cut into long strips, tape or tie off to secure. Store in an airtight container.

You are my hero! I must make this!! My kids would FLIP!
I haven’t had one of those fruit rollups for years, now I”m suddenly craving them. Or, I should say, I’m craving this ‘proper’ version.
I’m all over this! I’ve always wanted to make fruit leather and I think you just inspired me enough. I’d need a double…er…triple batch, for sure. Love the photo, Rachel.
Had I know that it was just a few simple steps I would have done this ages ago! YUM.
Look at you already baking and making things with those cherries ;) I used to inhale fruit strips as a kid, these would be dangerous to have around.
You are reading my mind because fruit leather is on my “To Make” list! My girls would love this I’m sure of it! :)
I have a cherry pitter and Silpats (and a dehydrator I never use!) — and cherries in the fridge! I need this leather!
These photos are just beautiful! I love this idea. Now you got me wanting a cherry pitter. That looks so much easier than my paper clip method! ;)
I got the cherry pitter too and was sad because I didn’t have any cherry recipes that I thought the kids would eat. But they will totally love these! I think I missed the window for cheap cherries here but I’m gonna splurge so I can do this.
So fun. I have tons of cherries right now and definitely need that cherry pitter!
gorgeous pictures! …and yet another reminder that I really need a cherry pitter! Too lazy to bake with cherries otherwise!
Oh my god I’m making this…. like right now. I have 6lbs of cherries that need to be used up asap.
i saw this this morning and instantly craved fruit roll ups and fruit by the foot — i used to be disgusting when i ate those..like i ate them so fast (more like inhaled them) that i could eat an entire box. gosh, kids are weird…beautiful pictures to display the rollups!
This is beyond brilliant Rachel! I am a fruit leather fiend!!
i’ve had fruit leather on my to-make list for a while now but had totally forgotten about it. this looks great – must try ’em soon!
These are great! So much better than the store bought kind!
What a cool idea! I love fruit leather, but still haven’t tried making it myself.
This is neat and I love that there are only 3 ingredients (with not too much sugar!)
This looks amazing!!!!
Im munching on fruit snacks, as I type. Fruit snacks, leathers, either way, I love them! Awesome job!
Love this!! Your photos are awesome too!
Oh yum! I need to make this for my son, he will love it!
I was never much of a fan of gummy snacks, but I did love fruit roll-ups! So homemade cherry ones? Yes please!! Cherries are on sale at Stop & Shop this week, I need to buy more :)
This is amazing looking! I would totally devour this! It’s a good thing I don’t have kids b/c they wouldn’t get a bite…haha ;)
Genius! I stocked up on cherries too! I love fruit leather like this. Of course the sugary fruit by the foot is still awesome, esp when you open 2 up and mash the ends together so it’s 6′ long then. Not like I ever did that…
Eeep! These sound delicious! I’m going to have to give them a go, quickly before cherry season is over!
Wow this looks good. Kids will go nuts over this.
I made them and i hope it all turns out cause I tripled the recipe and there is only so much space on the cookie sheets and pans and in the oven for a five hour batch. but I think it’s going to be very yummy. We have a cherry tree so I needed some other ideas for what to do with all these cherries. Thank you.
P.S. IF YOU DONT HAVE A CHERRY PITTER you can cut up a stiff straw and use that to pit cherries. I did that this year. I still don’t have a pitter. I borrowed someones last time we had a harvest. The trees harvest every other year.
I have a bunch of frozen cherries. I assume I can still make this, just not use any water? Has anyone ever tried it?
Just be sure your cherries are fully thawed and you shouldn’t have a problem.
Looks delicious! ‘I’m planning on making this today but I’m a little bit confused as to how you managed to boil 4c of cherries in only 1/4 c water… clarification? Also I’m not sure what you mean by when the cherries are “broken down”. Amateur cook here!
When the cherries and water cook, the cherries will soften and release their juices.
I just started making this at 8pm (I ended up having 10 cups of cherries!) realizing now it takes 5 hrs. Can I make the puree and store in fridge to make tomorrow?
Chilling overnight shouldn’t be a problem at all. Good look and I hope you enjoy them!
Is adding the extra sugar necessary or can it be omitted? (Family dietary need complicate things!)
You could certainly give it a try. It all depends on how sweet or tart your cherries are.
Can I use sore cherries for this Tart?
I’d use whatever you prefer and adjust the sugar as needed to offset any sweet/sour flavor.
Have you tried freezing these? I have a lot of cherries to use up!
I haven’t but I’ve heard it works well when packaged properly. You could also freeze the cherries for a later time! :)
Is the 170 degrees in Fahrenheit or Celsius?
It’s fahrenheit. Enjoy! :)
What can I use to substitute for the silicone mats?
Parchment paper has been hit or miss for people. It works for some and not for others. Your best bet is to use silicone mats, anything else and I can’t promise it’ll turn out.
My neighbor just gave me 3 large bags of fryed Cherry’s do think I could use them to make these
Absolutely! Enjoy :)
Was given MANY bags of cherries ,have frozen several and was so excited to find this recipe (I no longer have a dehydrator)I’m making these now for the grands!
Enjoy!