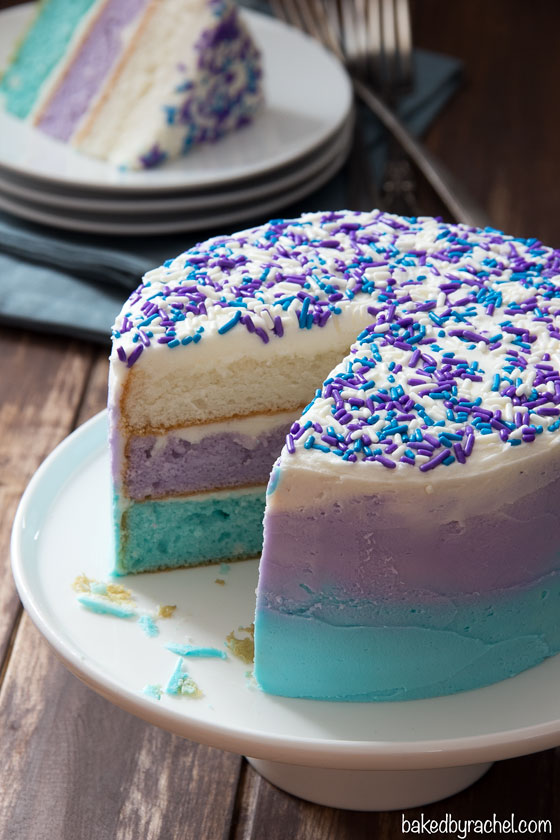
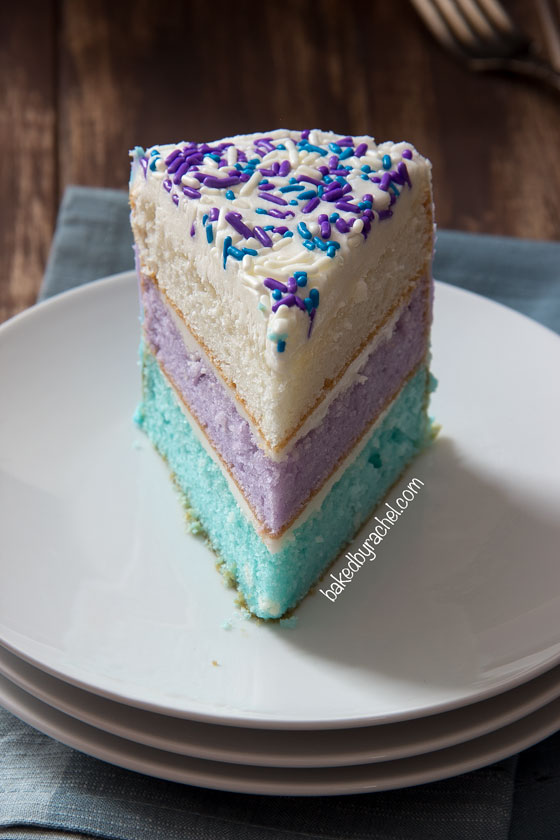
Surprise Watercolor Layer Cake with Vanilla Buttercream Frosting
A moist three tier layer cake that is colorful inside and out, topped off with a three tone vanilla buttercream frosting and colorful sprinkles to match.

I’m not much of a cake person. I sure to love to eat it, but I’ll be the first to admit they can be intimidating to make. Which is why most of the time I stick to cupcakes, or cookies… or cheesecakes! But, for some people making beautiful and inspiring cakes is easy, like Amanda of I Am Baker. Have you seen her site? If not, you definitely need to check it out. She makes knock your socks of amazingly beautiful cakes that I can’t always quite wrap my head around. My brain just doesn’t work like hers, from the inside out. But she sure has a knack for it.
Which is why she’s queen of surprise cakes. Not just any surprise cakes, but surprise INSIDE cakes. Beautiful creations hidden within.
When I had the chance to flip through the pages of her new book, Surprise-Inside Cakes, I was blown away. Not only does she walk you through how to create every cake, with photos! But it’s inspiration to create your own fun cakes.
Like many of you, I’m sure Frozen may be on repeat in your house. Songs stuck in your head. You even know the motions to the songs and exactly when a character might do or say something specific. So the colors of Frozen were stuck in my head. I took the general idea from Amanada’s sunset cake, and created this. It sure was fun and delicious! Moist and full of color, inside and out! I even created a fun custom sprinkle mix for the occasion… sprinkles just make everything better. Plus… they sure are an easy way to hide any imperfections. ;)
Have a Frozen birthday party coming up? This would be a fantastic addition to your plans!
Surprise Watercolor Layer Cake with Vanilla Buttercream Frosting
Ingredients
- 1 box favorite vanilla cake mix
Crumb coat:
- 1/4 C vegetable shortening
- 1/4 C unsalted butter, softened
- 1/2 tsp vanilla extract
- 2 C powdered sugar
- 1 Tbsp water
Frosting:
- 1/2 C vegetable shortening
- 1/2 C unsalted butter, softened
- 4 C powdered sugar
- 2 Tbsp water
- Blue and purple gel food coloring
- Sprinkles
Instructions
- Prepare 3: 6-inch round cake pans by greasing and dusting well with flour. Discard excess flour.
- Prepare batter according to box directions. Divide batter into three equal portions, into clean bowls, roughly 1 2/3 cup per each. Tint one bowl light blue, another light purple and the other stays white. Transfer to prepare pans. Bake for 25 minutes or until centers are set. Cool in pan until cool enough to handle. Transfer to a wire rack to cool completely. Carefully slice off domed tops from cakes.
- Prepare frosting for crumb coating. Mix all ingredients together until smooth. Place blue cake on a clean work surface covered with wax paper strips or a cake board, if desired. Add a thin coat of frosting to the blue cake, top off with purple cake. Repeat frosting layer and top off with white cake. Carefully coat entire top and sides of cake with a thin layer of frosting, sealing in any crumbs. Transfer to the refrigerator to harden for at least several hours or overnight.
- Prepare larger frosting batch. Cream together shortening and butter, followed by 1 cup of powdered sugar at a time. Finally, add water and continue mixing until frosting is smooth. Divide into three equal portions, transferring to three clean bowls. Cover white frosting immediately with plastic wrap. Tint a second bowl light blue, to match the cake. Cover well with plastic wrap and repeat process with remaining frosting, tinting purple to match the second cake layer.
- Remove cake from refrigerator. Starting from the bottom of the cake, using a small offset spatula, spread a small amount of blue frosting along the bottom tier. It doesn't have to be perfect. Clean spatula. Add purple to the center of the sides of the cake. Clean spatula again, add white to the top and top portion of the sides. Clean and warm spatula as needed to smooth sides and top.
- Carefully transfer cake to desired serving plate or cake stand. Touch up edges as needed. Top off with sprinkles.
- Store in an airtight container for up to several days.
Notes
This post contains affiliate links.

Love the use of the frozen colors. This cake looks amazing!
Thanks Laura!
This cake is stunning!
Thanks Marla!
This cake is so beautiful and stunning.
Thanks so much, Mariam!
Just beautiful <3
Thanks Amy!
This is a seriously stunning cake!
Thanks Meriem :)
The colors in this are just SO pretty. I’d never have the patience for making this but I sure do want a slice of yours!
If you lived closer I’d have gladly given you a slice or two :)
This cake is beautiful! I love the color combination that you used and the sprinkles are beautiful! Gotta love a colorful, happy add-on that hides any frosting sins!
Thanks Lindsey!
This cake is GORGEOUS. I think I’d have a hard time cutting into it because it’s so pretty! But then again, cake. Can’t pass it up. ;)
Thanks Stephanie! :) I was eager to slice and see if the inside turned out haha
Rachel. this cake is seriously stunning. Gorgeous! Cakes may intimidate you, but you sure did a great job. Love this. Pinned.
Thanks so much Jennie :)
Wow! this cake looks so good and delish! will try this soon… :)
Thanks Ziela!
Amazing! This is a serious beautiful cake :-)
Thanks so much Chloe :)
So gorgeous!!! I’m gonna tray and do an ombre cake for Logan’s b-day this weekend and this will be my guide!
Can’t wait to see it!! :)
This is a beyond gorgeous cake! I LOVE the colors – the purple and the blue are such a perfect pastel shade. I need to see Frozen!
Aww thanks :) And seriously, you need to put that at the top of your queue!
This cake is gorgeous! I need to get on it and bake a cake from her cookbook soon. I have to admit most of the cakes intimidate me but I’m going tot ry cause she provides great step-by-step photos!
The step by steps definitely make her designs so much less scary. :)
This is a gorgeous cake!!!!
Thanks Claire!
Wow, it’s so stunning!
Thanks Angelyn! :)
Such a beautiful cake, I love those colors! I’m like you I love to eat cake, but find it a little intimidating to make. I’m going to have to check out Amanda’s new book, hopefully she can build up my confidence to try making one!
Thanks Danae! You definitely need to check it out :)
Absolutely stunning Rachel. Pinned to my ombre pinterest board
Thank you :)
What an absolutely amazing cake! I love the colors you used for it!!!
what a lovely cake!
Thanks Dina!
Can you make this into cupcakes??
Unless you were to slice and stack individually. A clean look with cupcakes can not be achieved with varying shades of batter.
This is stunning! I’m trying to think up an occasion so I have an excuse to make it. Love it!
Have a beautiful day Rachel!
Can I make this cake in 8 or 9 in round pans? If, so what do you think I should change?
You can absolutely make this with an 8 or 9″ pan. Keep in mind they will be thinner layers, but it would still turn out the same in the end. I’d increase the frosting, just to be sure you have enough for a larger cake.
Wow! Going to give this a shot for my daughter’s 6th (Frozen) bday party this weekend. Will be the perfect finishing touch.
Good luck! :)
About how many servings does this 6-inch cake make? I’m wanting to do a 8-inch cake, I think. I’m needing to feed about 20 people. I’ll need to increase the cake mix, I’m sure. Beautiful cake…can’t wait to try it this week.
It really depends on the size of the slices, so there isn’t an exact number. If you were to increase to an 8″, you would definitely need to increase your cake mix. Good luck! :)
This cake looks amazing! I’m going to try it for my daughter’s 3rd birthday! (Frozen theme of course!!) I just wanted to be sure. You only put vanilla in the crumb coat, not the atual frosting itself? Thanks for this post! Pinned!!
You can add vanilla to the exterior frosting if you’d like but I wanted to make sure the white stayed true white and I happened to be out of clear imitation vanilla at the time. Good luck! :)
Would it be possible to tell me what exact colours you used please ? A friend has asked me to recreate this kind of coloured sponge for her daughter. I’m only a hobby baker so haven’t got the experience with the colours! Many thanks.
I used gel colors in violet and sky blue. Good luck!
Lovely cake, I would like to make it for my daughters birthday this coming Tuesday. Do you think it’s possible to make it in a 9×13 size pan?. I’m not a baker but I was thinking of doubling up in the cake mix. Would that work?
I haven’t personally adapted it to a larger pan. You would still want to bake each layer separately and then stack, as done in the directions. As for amounts, you would at the very least want to double the recipe, possibly more depending on the thickness you’re hoping for. Also, be sure to watch and adjust the bake time as needed for that size cake. Enjoy!
Hi im making a two tier cake 6″ and 9″ frozen cake, but have been asked to make this three coloured sponge. I wanted to know what 1 box of vanilla cake mix is. I make mine from scratch so wasn’t sure if this is a brand? If so can you give me ingredients and measurements for a 9″three tier cake please? Many thanks cassie
Simply make your favorite white batter and divide it into thirds.
I would like to know if I can use whipped cream frosting for this cake? Thanks for your time and hope to hear back from you soon :-)
If it’s a frosting you’re comfortable working with, then by all means give it a try! Good luck :)
This is so wonderful! Going to try this weekend! Did you use a vanilla cake mix or a white cake mix?
I believe it was ‘white’ cake mix, using only egg whites.
will this work with 8 inch cake pans and how much batter should be put in each cake pan?
You would need to double the recipe for 8″ pans and then divide the batter in thirds.
Hi,
Excuse me for my english , I’m French girl. I love your cake , it is “waouh” . I would do it for my daughter’s birthday . I understood the directions. My problem is the amount of ingredients. What is C: a cup ? ( what capacity ? Here it is in ml for liquid), and the abbreviation tsp ? and tbsp ? And what is vegetable shortening ?
Last question (sorry…), the crumble coat is it a what we name “génoise”.
Thanks you for helping me.
C = cup, tsp = teaspoon, Tbsp = tablespoon. There are free online conversion calculators you can use to figure out what the amounts would be that you’re familiar with. Shortening is a fat used for making pastries, frosting etc. You can substitute butter in it’s place, if it isn’t available to you. The crumb coating is simply a thin layer of icing over the cake to hold in any cake crumbs.
Thanks you.
Beautiful cake. Thanks for the tutorial. I know you used the Wilton gel colorings. About how much did you add to each layer please? I am afraid to add too much and have the cake taste like food coloring. Thank you.
A tiny amount of gel color goes a long way. I like to use toothpicks to catch a bit of the gel color, mix in and add additional as desired for a darker or brighter shade. I think you’ll find with the gel colors, you’re far less likely to taste it as you would with a large quantity of liquid food coloring. It’s super concentrated so you only need a small amount to achieve a desired look. Good luck!
Hi there, would you be able to point me in the right direction for the type of candy sprinkles you used? Would love to make this cake :)
This wasn’t a prepackaged mix. I created it combining colors from various solid or mixed color packages.
When you say shortening , are you referring to something like Crisco solid shortening?
Yes, Crisco is shortening.
Well I have never heard of eating solid shortening in the raw format. It’s just a little different for me.
Shortening is very common for certain frosting recipes as it makes the frosting more stable in warmer temperatures. It also offers a bright white frosting vs the full butter version, which makes it better for coloring. It is occasionally used in cookie recipes as well.
What a gorgeous cake!! Nicely done. I’m so excited to dive in for the challenge. My question is with what size cake pans you used, how many servings would you say this could feed? I’m looking to serve around 15-20 so if this would be enough I wouldn’t have to double the recipe by using 8 inch pans. Just trying to get an idea.
Thank you in advance!
-Autumn
I would suggest increasing your cakes to 8 or 9-inch pans to have enough for your party size.
This may be the dumbest question ever, but I have to ask! When choosing your ‘yellow’ cake mix, should I pick a white cake mix instead of a golden yellow box? Just worried that the gold tone in the yellow won’t work well with the gel food coloring. Thank you so much!!
You’ll definitely want to choose a white cake mix, not golden yellow, as you not only need a white layer for this cake design, but white will also tint better. Good luck! :)
I am going for this same look but with (3) 9 inch cake pans. (Each 2 inches deep). I have seen some tips online for making layer cakes and many suggest having a cake leveler on hand. Do you feel this would be necessary for this type of cake? I don’t remember any mention of having to shave off layers in order to stack them so I just wanted to be sure. Thanks a million!
If your cakes turn out slightly domed, you should definitely trim away any necessary cake to make them flat and stackable. A serrated knife would be sufficient if you don’t already have a cake leveler.
Hello, do you bake all three cakes at the same time for 25 min? Or do you bake them separate for 25 min each? Sorry newbie cake maker here ;-)
Each cake should bake for a total of 25 minutes. You can bake three at once, if you have 3 cake tins, or one at a time.
Looking at this post from Pinterest and am making the cake for my daughter’s birthday. What are the measurements for the crumb frosting vs the frosting to cover the cake? Can I make the whole batch at once and then just let it come to room temp before The second round if frosting? Thanks!
There aren’t specific measurements for them separately. Do a thin crumb coat layer and the remaining frosting is for coating the cake later. It would be best to leave the frosting out at room temperature, covered well. Good luck! :)
Made this for my little sisters birthday party (she’s four) and I’m making the icing and the cake turned out great, gel food coloring works best for the color 👍
I’m glad it turned out well for you and happy birthday to your little sister! :)
Can I ask how you get your plain cake and white icing to be so white? Mine always are slightly yellow from the butter
I’ve never had an issue with yellow frosting or cake. It could be what butter you’re using, if it happens to have more of a dark color to it.
I would love to make this but I wonder if you have any tips as to how you got your cake mix so white. No matter what vanilla cake mix I use it comes out more yellow on account of the butter and egg yolks
Your best bet is to use only the whites of an egg. I’ve never had butter change the color of my cake but the yolks absolutely will. Be sure to use white cake mix, as it should state to only use the whites. :)
This cake is beautiful and stunning! I would love to make it, but I would say most people have 9 in. round cake pans (I have 3). Do you possible have instructions on how to make a 9 inch 3 layer cake? Thank you so much. I’m in awe of this gorgeous cake.
Since this uses box cake mix as the base, you can follow the instructions on the back to make 9-inch layers. If that doesn’t work for you, 6-inch pans can be purchased rather inexpensively at most craft stores, Walmart, Amazon etc. Good luck! :)
The looks so amazing. I just wonder why you would use shortening in the “buttercream icing”.
There are a variety of buttercream styles, some include shortening and some do not. The amounts will also vary from one recipe to another. Buttercream with shortening included as an ingredient or as the only fat in the recipe is ideal for warmer temperatures as it won’t melt or soften as quickly as one that only uses butter.
It worked ! I’m not a wonderful baker and made this cake for my daughter’s frozen party ! It took me lots of time and it wasn’t as pretty as the picture but I was really happy with it and people were shocked I made it.
I’m so glad everyone enjoyed it. I’m sure it turned out wonderful! Happy birthday to your daughter and thank you for sharing! :)