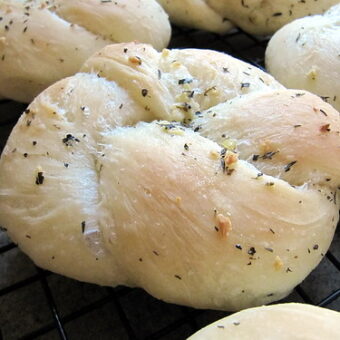
Garlic Knots

Being January, most people really don’t want to hear about or see sweets. As much as I’m protesting making and sharing healthier dishes, I will at least hold off on making and sharing any desserts for a while. Well, maybe just this week. I’ve been really wanting some cookies or chocolate lately and I still need to find the perfect brownie recipe. I’m on a quest to find the right fudgy recipe this year.
In the meantime, I needed and wanted to come up with something else new to make this week. After much searching through my bookmarked recipes, I decided on Annie’s garlic knots. It’s a pretty quick dough to whip up but does require regular rising time, so plan for several hours – most of which is down time. The dough itself is beyond easy to work with. I was very impressed with how well it rolled. I had to make a slight change along the way because I didn’t have Italian seasoning for topping, but what I put together worked out perfect.
When I first tasted the rolls I was expecting a stronger garlic taste. Now that can easily be remedied by simply making sure more of the garlic gets on to each roll or even a slight sprinkling of garlic salt prior to baking. Though after consideration, the flavoring is just right. Everything works really well together. The best part of these rolls are how incredibly soft and fluffy they are. I’ve never had a homemade roll that was this tasty. I mean it. I think these might be my new go to dinner roll. They’re simple, delicious and even the kids give them a big thumbs up. I have to say, these are the first rolls I’ve ever eaten without butter. Amazing all by themselves.


Garlic Knots
Ingredients
Dough Ingredients:
- 3 1/4 C bread flour
- 1 Tbsp granulated sugar
- 2 1/4 tsp instant yeast
- 1 1/4 tsp salt
- 2 Tbsp olive oil
- 1/4 C milk
- 1 C warm water
Topping Ingredients:
- 2 cloves garlic, minced
- 3 Tbsp unsalted butter
- 1/8 tsp salt
- 1/8 tsp dried parsley
- 1/8 tsp dried basil
Instructions
- In the bowl of a stand mixer fit with a dough hook, combine dry dough ingredients. Start with only 3 cups of bread flour, reserving more for later if necessary. With the mixer set on low, begin adding the wet ingredients to the dry. Continue mixing until a nice ball forms that isn't too sticky. Mine was still sticking to the bottom and sides of the bowl a bit with just 3 cups of flour so I began adding slightly more until a ball had formed. I ended up using just under 3 1/4 cups of bread flour for this dough, but as with most doughs that could change depending on the weather so play it by ear.
- Spray a large bowl with olive oil. Toss dough into the bowl and flip so all sides of the dough are coated. Cover the bowl tightly with plastic wrap. Let rise in a warm location for an hour or until doubled in size.
- Prepare a baking sheet with a silicone baking mat or sheet of parchment paper, set aside.
- On a clean counter mat or work space, divide dough into ten equal portions.
- Grease hands with olive oil prior to rolling out each portion of dough. Starting with one piece of dough, roll a long rope or snake - roughly 10 inches long. Tie into a knot. Take the under tail and fold into the center of the top. Take the remaining piece that is hanging over the top and fold that down into the center of the bottom. (See images for reference)
- Transfer to your prepared baking sheet. Continue process with remaining portions of dough. Cover with a clean kitchen towel and let rise for 45 minutes or until puffy.
- Preheat oven to 350°F. In a small bowl add freshly minced garlic, 3 tbsp butter and seasonings. Microwave for 30-45 seconds or until butter is fully melted. Brush seasoned butter over the top and sides of each roll.
- Bake for 15-20 minutes or until just slightly golden. They will be extremely soft to the touch. Do not overcook. Transfer to a cooling rack to cool completely.
- Serve warm or store in an airtight container for several days.

These are just beautiful! I might even be inspired to actually bake :)
Yum! I bet that homemade garlic knots are so much better than what you get at the pizza place!
Yum! These look so good!
Oh, these look really good.
These look delish. The problem with making these, I’m pretty sure I would them all in one sitting without anything to accompany it.
I love garlic knots but never thought about making them myself. I’m still somewhat scared of yeast, my success with it has been hit or miss so far. I may need to give it another crack though!
…Oh my. Seriously. Oh my. These look…*speechless* :o)
…Thank you for the recipe – I will definitely be trying my hand at these and soon!
…Blessings… :o)
I made these this evening and they are DELICIOUS!! My husband and I ate all 8 in one sitting with our spaghetti. :/ Definitely the dinner roll of choice in our house from now on. They are super easy to make as well. I have never made any yeast bread/roll before this and was incredibly pleased with how they turned out. YUMM!!
I’m so glad it worked out for you Elle! They’re too good to not have another so I know why you couldn’t resist them. We had a hard time resisting them too! :)
Saw these on Tasteologie! They are so pretty and perfect, I am impressed. I love garlic, I might have to add some extra if I make them!
Just make sure you get all of the garlic that’s in the butter mix onto the rolls and it shouldn’t be a problem. I didn’t do that and wish I had, but were still just as good with only a little.
I’m dying to make these for my date tonight. They look absolutely delicious! But I only have active dry yeast, and no time to run to the store. How would I have to modify this recipe?
Erin – Supposedly rapid rise/instant yeast and active yeast can be used interchangably. The only difference is with rapid rise/instant yeast you typically have less overall rise time compared to active dry yeast. Follow the recipe as is using the yeast you have on hand, but just watch how much the dough rises. Make sure it doubles in size before trying to split it up and work it into knots. You may even want to do a double rise, but that may not be necessary. I hope that helped some. Good luck!! Let me know how they turn out if/when you try them. :)
Thank You!
I was actually using a bread machine as well, so I proofed the yeast beforehand with the water and sugar from the recipe, then combined everything in the bread machine. I also used the machine to add seasoning and some minced garlic into the dough. They turned out absolutely fabulous! Between everyone in the house, there were none leftover! This is absolutely going to be a staple for any get together or potluck! So easy :)
Erin – I’m so glad they turned out for you! Good call on adding garlic and seasoning into the dough. I considered that after the fact and will have to remember it next time I make them.
You know a recipe is great when six kids and a hubby say more please! Easy to make and so tasty . A new family favorite . Thanks for the great recipes Rachel.
Bookmarked. My husband would die for these.
Not the right time of year for dessert? Not in this house!
Seriously…this has got to be one of the best bread dishes I have seen lately. I am a huge bread fan and when you add a layer of garlic seasoning…oh my!!!
I’m going to ask a real dumb question here, but I’m a novice when it comes to baking anything that requires yeast, so I figure better to ask a dumb question than to mess up. ;) When you say to put all the dry ingredients in together, does that include the yeast? I always thought you were supposed to dissolve the yeast in warm water and then add it. Gotta say I would like your way much better, as I have been hit and miss with the other way, but…
Just want to make sure I get this right as I want to make them for my little brother’s birthday lunch next Saturday. :)
Yes! :) Add all of the dry ingredients into the bowl to start – including the yeast. Just make sure to use rapid rise and not active dry yeast. That’s the key to why it can be added to the dry ingredients and not dissolved in water first. It can be done with rapid rise but I’ve never seen that done with active dry. I was shocked how easy these were to make so I hope it’s just as easy for you. Let me know if you have any other questions and I’ll do my best to help. :)
Thank you so much! Of course, it never fails that I only have the active yeast at the moment, not the rapid rise… back to the grocery store! LOL!
No problem and good luck! :)
hi rachel i decided to make this garlic knots and they are absolutley delicios!! i was suposed to take them tomorrow for christmas eve but i already ate like 6 so i have to make more thanks for sharing this recipe i love it! besides i’m gonna add a bit of garlic powder into the dough to have a more garlicy flavor. i’m sure my family will love them
happy holidays from mexico
You made me laugh! This is so something I’d do. So glad you enjoyed them. Have a wonderful holiday. :)
these sound absolutely divine! Can’t wait to try! just have to get the yeast. only have active yeast.
These were de-lish!!! Only thing was they were HUGE!!! I now use the same recipe but roll out about 18-20 and make either knots or leave them at this stage and make simple garlic breadsticks. I thank you and my family thanks you for the wonderful addition to our pasta nights :)
From what I remember, yes they can be pretty big BUT are very tasty and can of course be made smaller or into different shapes, as you did! :) So glad you enjoyed them!