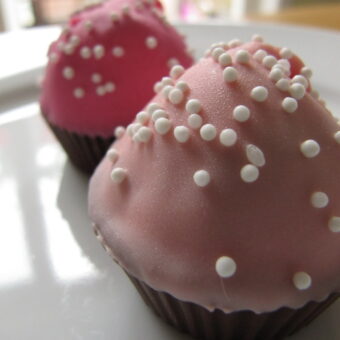
Brownie Bites

Most people by now have at the very least heard of cake pops or something along those lines. A friend had even asked me to make them sometime and turn it into a post. I couldn’t bring myself to make cake pops or bites, not to mention that making nicely round bites covered in smooth chocolate is a lot harder than it looks. Not that I have anything against cake pops or bites, I just didn’t want to jump on the bandwagon. It’s one of those items right now. An everyone is doing it kind of thing.
Time went by and I found myself facing a major milestone birthday. The big 1… o n e! Yikes. I know a one year old doesn’t really care what food is there or isn’t. They could care less if there is cake, cookies, sandwiches, burgers, you name it. They’re one. They’re not going to remember it. The only way they’ll ever know what happened, what was eaten, who was there, etc is if there is picture proof. Well… of course if it’s me and my kids, there are going to be pictures. Lots of pictures. I’m big on pictures. The more the better!
I’m also the kind of person that regardless of age or event I want there to be something special and different to eat, even if it’s a new cookie. Still… I couldn’t bring myself to make cake pops or bites. Plus, there would already be cupcakes so more cake was totally not necessary. I thought okay, what’s the harm in trying to make brownie pops or bites. I figured brownie mix was on sale at the store that week for $1 so I wouldn’t be wasting much if even the start of the experiment didn’t work out. If the brownies didn’t turn out then I’d just scratch it at that point. As my luck would have it, apparently all of the stars had lined up for this one. It went perfectly smooth.
I honestly don’t recall some of the comments I received for these but really – just wow – if you love brownies, which means you likely love chocolate, you must must must try to make a batch sometime. Or when I get around to figuring out a bakery name and making stuff from home to sell, maybe I can be convinced to offer brownie bites or other bites in my selections.


As Josh was biting into one I said ‘Wait! I need to get a shot of the inside’. haha If you’re a food blogger, you understand. :)
Brownie Bites
Ingredients
- 1 batch of brownies, box mix or homemade
- 2 colors of chocolate melts
- sprinkles or other decorations
- pastry or sandwich bags
- peanut butter cup mold
- 1 small heat safe bowl
Instructions
- Bake 1 batch of brownies as you normally would. *Do not overcook. Take them out of the oven just as the brownies are pulling away from the sides of the pan.
- You need to be ready to go when the brownies come out of the oven, so as they cook prep your area and supplies. Choose which color will be your base, or the wrapper, of your cupcake. I chose traditional brown because it's cute and works with just about any 'frosting' color. You won't be using everything immediately but I also feel it's best to have everything out at once so you're not searching for it later.
- You have two options with your brownies: remove the brownies from your pan, place it on a cutting board and remove the edges OR leave the brownies in the pan and just work around the edges. You do not want to use the hard edges in the brownie bites. I left my brownies in the pan, it helped to keep the mess in one location rather than making other items to clean up later.
- Place a sheet of wax paper on a large cookie sheet. Begin making 1" brownie balls, give or take in size. I don't think any of my brownie balls were the same exact size or shape. If you try it you'll see just how hard it can be to get brownies to stick together. When you are done making brownie balls, place cookie sheet in the freezer for 5-10 minutes. This will help them set a bit and make them easier to work with.
- Fill one pastry bag with chocolate melts. Tie off the end or simply twist it and shove it under the bag when you heat it up. Heat in 30 second intervals at 50% power until the chocolate is completely melted. Gently squeeze the bag and smoosh around the chocolate after each 30 seconds. This will help the process along.
- Remove brownie balls from the freezer. Begin filling your molds with the chocolate base. Fill roughly half way. Top each chocolate mold off with a brownie ball. Gently push the ball into the chocolate causing the chocolate to work it's way up the sides of the cavity. You want the chocolate to reach the top of the mold, if it doesn't, gently squeeze a little more chocolate into that area with your bag. Pop the tray into the freezer for 5-10 minutes or until the chocolate has completely set. Check for doneness. When they are ready they will easily pop out of the molds - do not take them out of the freezer just yet!
- When they are done, melt your 'frosting' chocolate in a heat safe bowl. Roughly half of a bag will do for this process depending on how many bites you are making. Same process as before - 30 second intervals at 50% power. Use a spoon to stir until the chocolate is thoroughly melted and smooth. Let your chocolate cool for one to two minutes before working with.
- Remove mold from the freezer. Pop one brownie out at a time as you work. Holding the base, dip the brownie ball into your 'frosting' chocolate. Swirl it around and dunk it gently until you have covered the entire brownie and covered any holes.
- Place on a cookie sheet or plate, sprinkle or top as desired while the chocolate is still wet. Chill bites to set the chocolate.Continue this process until you have coated and decorated all of your brownies.
- Store in the fridge in an airtight container.

What a great idea! These look like a much easier alternative to cake pops, but they still are adorable.
Just curious…did you use a binding agent when rolling the brownies in to balls? I know the traditional cake ball recipes often call for using canned frosting to bind the brownie/cake together.
I did not. So long as your brownies are good and moist and fairly fresh from the oven they should compact well.
What kind of molds did you use for these brownie bites? Please post link? Thanks.
This post is nearly 5 years old, so I don’t have the information you desire. But if you do a search for chocolate molds, I’m sure you could find something that would work well.